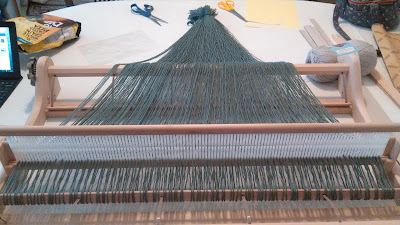
After the loom is threaded and ready to go, I rest it on the side of the dining room table and can sit as I weave.
A lady from the Ashford Company has youtube tutorials that made it possible for me to weave on my own, without lessons. She shows how to warp the loom -- i.e., how to load the vertical yarn onto the loom. That yarn (the darker color this time) is the warp.
Here's the video, for any that want to watch. Jenny W., you KNOW you want to :)
I pulled the loom out from under the Christmas tree and assembled all the smaller parts. That's when I noticed one piece was missing: the threading hook. Yesterday I made do with a piece of cardstock cut to size, and later a tiny crochet hook. Today, Adam is making me a threading hook from a flat piece of copper. It's pretty.
I never knew that yarn is what you load a loom with. This particular loom uses yarn slightly lighter in weight that most of the worsted weight yarn we knitters use in the U.S. I bought 3-weight yarn (baby yarn), also called D.K. yarn in England, Australia, and New Zealand, where this loom was made.
These were the most non-babyish colors I could find.I'll add here that I think this loom could also be threaded with 4-weight yarn. I think the eyes are large enough to accommodate it. If so, I have a huge supply of yarn at hand already. I especially think that Simply Soft (which is a tad bit smaller/thinner than other worsted weight yarn) would work. I have lots of that already.
Okay. I clamped the loom to one side of my table.
The clamp fits into a hole on the back of the loom.
This part confused me. I had to start three times before I got it right. The yarn sits in a bowl on the floor. The yarn end comes up and ties onto the back stick, a loose stick away from the roller to which the yarn is all attached and which helps keep the tension.
Some success, finally! The yarn loops around the back stick, goes through the slit in the plastic strips in the heddle, and loops around the warping pin, which is clamped to the other side of the table.
My loom and I, reflected in the antique halltree mirror from my husband's family. Too many scarves and hats!
Some photos of the fully-threaded loom:
I tied the yarn to the back stick again at the end.At this point I felt it looked remarkably like the innards of a piano.
There's the warping pin at the far end.
He came in from his compost piles and held the yarn ends with a good tension while I rolled the threads onto the back roller.
As I rolled the yarn onto the roller, I inserted sturdy strips of cardboard provided for that purpose -- to keep the yarn strands aligned.
After removing the scrap yarn tie, I turned the loom around so that those ends were toward me, the correct position for weaving.
And I sat down with the loom in my lap for the second threading. See how the loom's back has a cut-out that rests on the table neatly?
The second threading involves removing one of each pair of threads from each slot and threading it through the eye to its right. This is when I used the crochet hook.
And I laid the threaded yarn up over the heddle.
I tied the loose yarn ends in bunches of about 1" each.
This is the step I think I did badly, and I believe it affected my weave later on. The Ashford lady said to try to made the knots lay evenly across -- to keep them the same distance from the heddle. I called myself trying to do that, but next time I'll try harder.
That's what the warp looks like, when you're ready to begin weaving. See how my knots don't really go straight across? With a long piece of sturdy string (I used cotton yarn because I have no string in the house!), I quite tightly tied each knot to the front stick as the lady in the video told me to. I tried to even out the tension.
They say to do a few rows with some scrap yarn, to get the tension going on those first few rows. I'm assuming those will come out later when the piece is finished.
The blue is scrap yarn.
I'll do another post on this after I weave today. I hope you enjoyed this!


7 comments:
I see many blogs about weaving and it definitely seems to be addictive. I don't know where you find the time....and for a hubby to come in from his compost heaps is amazing!
Oh, this is truly wonderful! It blesses me so much to read how Adam has been involved in your dream, too. The best. All the way around!
It looks very complicated to me, but I love the look and feel of weaving. How exciting and what a Gift! Looking forward to learning more and seeing the results of your handiwork.
Oh wow you are now a weaver. Well done for learning so quickly. It is beautiful.
What a great job, it looks wonderful and really like the csubdued colors.
Incredible, so glad you got to live a dream...looking forward to seeing more soon....D
Wow M.K. ~ You are taking off with weaving just like Adam did with farming. It's nice to see your dream coming true, and that Adam is helping in the process. You are a God blessed team.
It looks complicated to me also, and not something I'd like to try. I will enjoy seeing all the weaving that will be coming from your loom in the days ahead.
Happy Christmas ~ FlowerLady
Post a Comment